
Workflow
Workflow lets you choose what happens after someone submits your form. Send emails, forward answers to other tools, update submission statuses, and route submissions based on their answers.
Each form has its own workflow. You build it on a visual canvas, starting from Submission received, and select Publish to make it live.
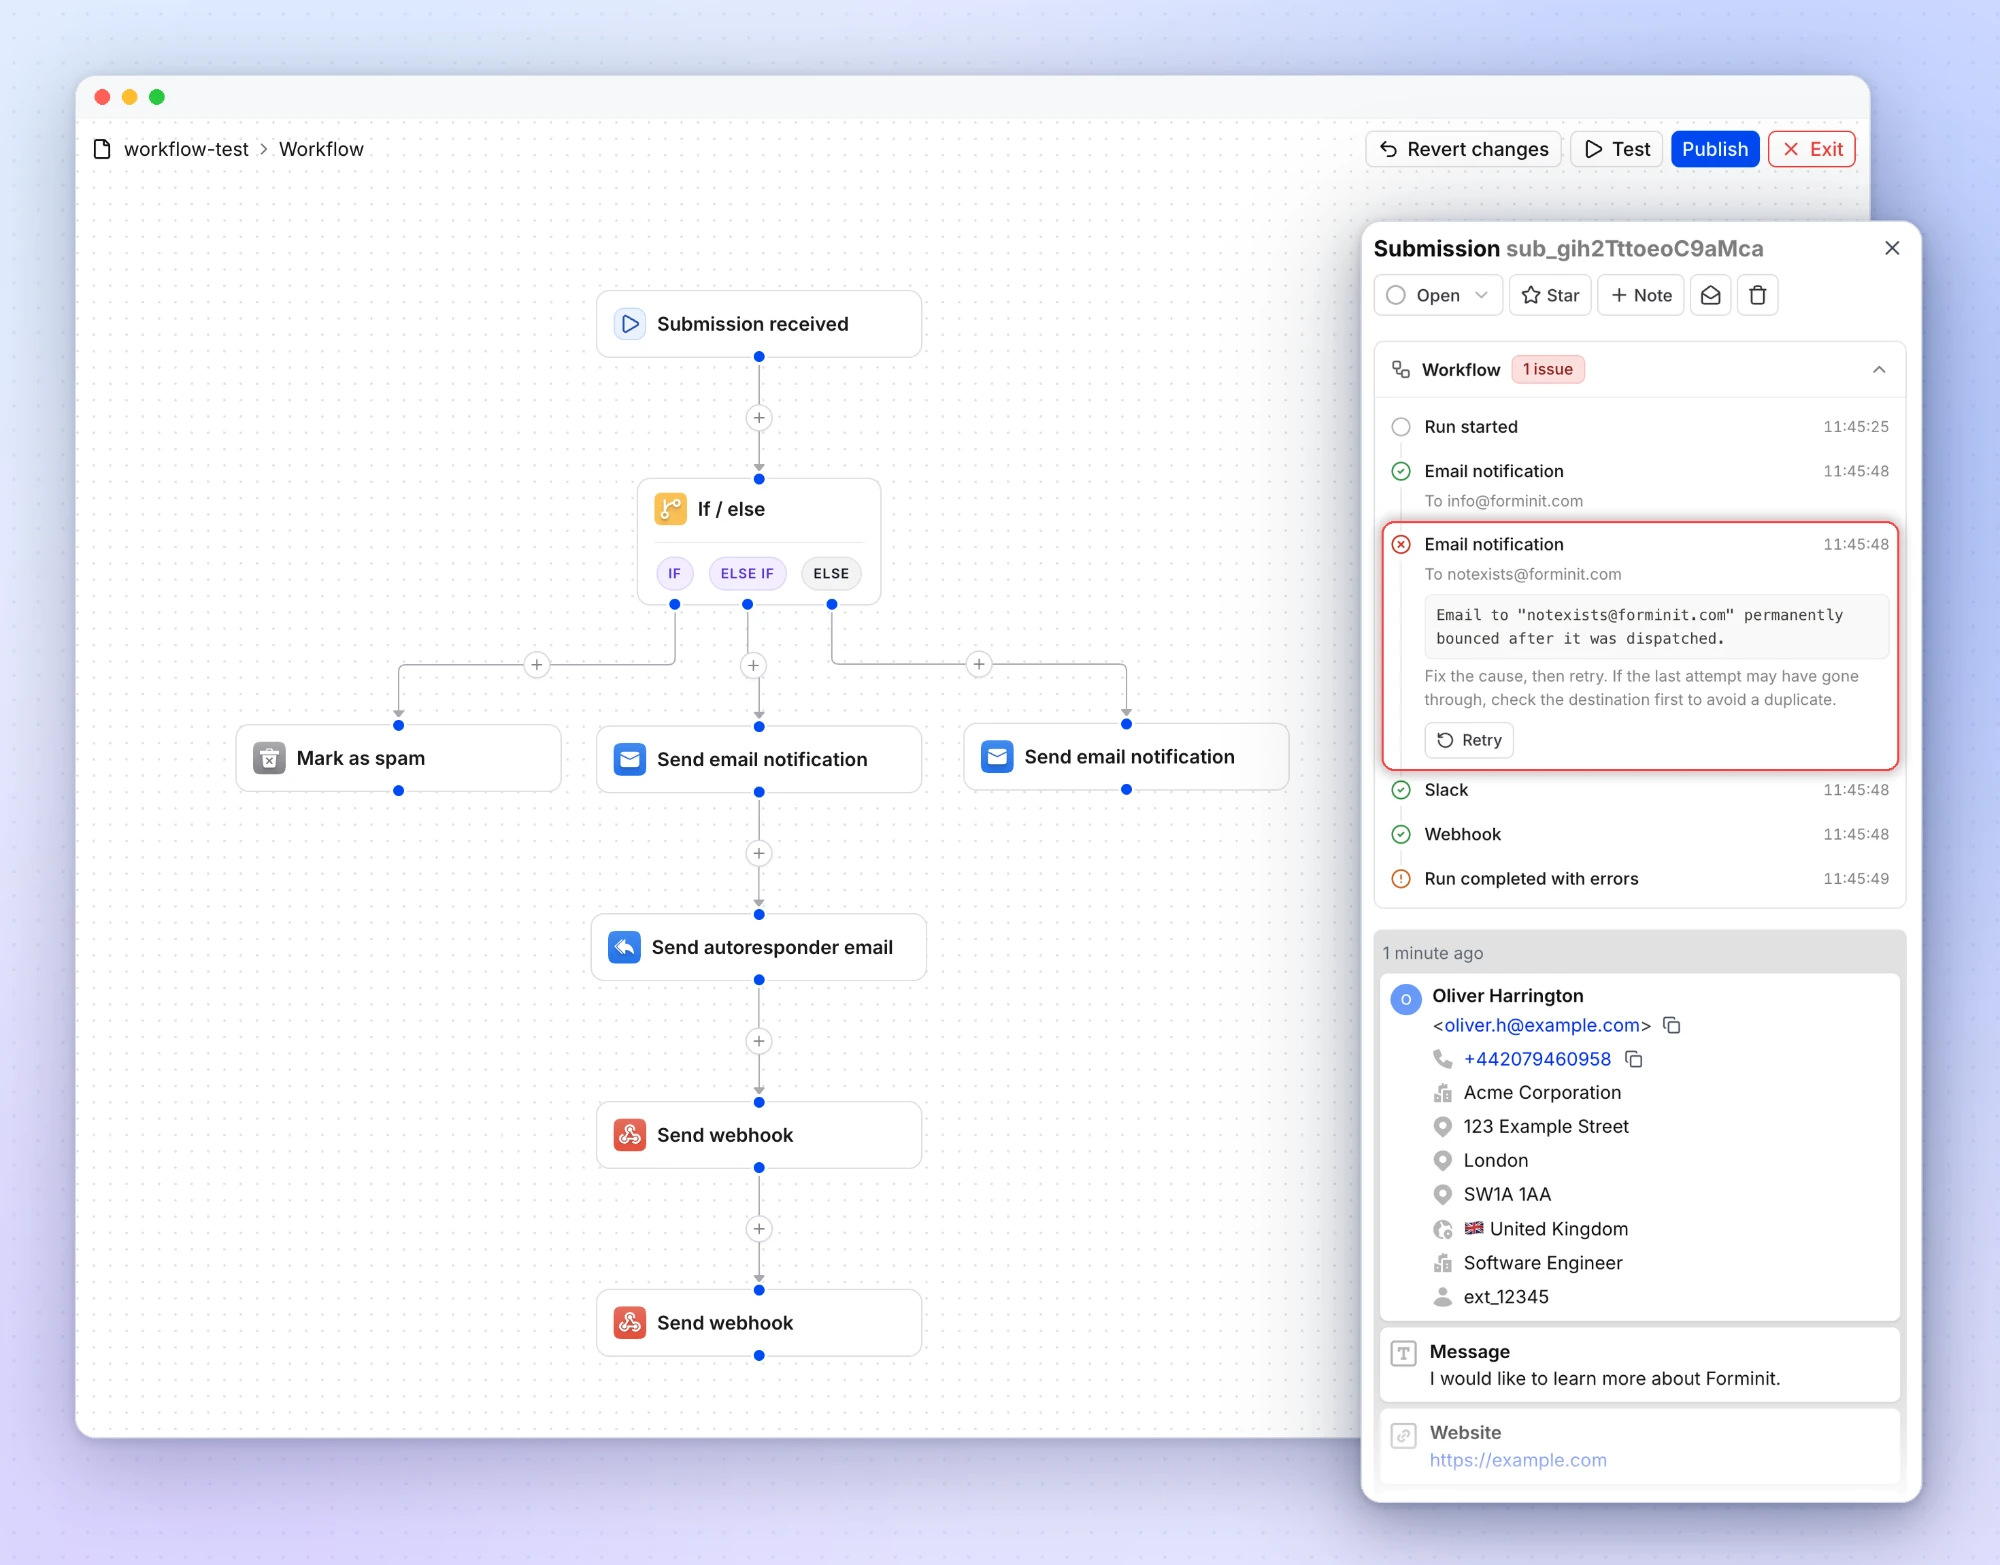
A workflow reads top to bottom. Each step runs after the step above it:
              ╭───────────────────────╮
              │  Submission received  │
              ╰───────────┬───────────╯
              ╭───────────▼───────────╮
              │ Send to Google Sheets │
              ╰───────────┬───────────╯
              ╭───────────▼───────────╮
              │       If / else       │
              ╰───────────┬───────────╯
             ╭────────────┴────────────╮
             │ If                      │ Else
  ╭──────────▼──────────╮   ╭──────────▼──────────╮
  │      Send Slack     │   │      Send email     │
  │     notification    │   │     notification    │
  ╰─────────────────────╯   ╰─────────────────────╯
In the diagrams on this page, boxes are steps, arrows show the order they run in, and the labels on branch lines name each If / else path.
For example, a contact form can send sales enquiries to your sales team and support requests to your support inbox. A quote form can add every lead to Google Sheets and notify Slack when a project meets your budget threshold.
Create your first workflow
Section titled “Create your first workflow”Start with an email notification so your team knows when a new submission arrives.
-
In your Forminit dashboard, open your form.
-
In the form header, select Workflow, next to Share and Settings.
-
Select + beneath Submission received to add a step.
-
Select the empty step, then choose Send email notification from the action list.
-
Select the notification step to open its settings. Add your recipient address and subject, and choose Default for the message to include the submission’s answers.
-
Select Publish. If Forminit highlights an incomplete step, finish its settings and publish again.
-
Submit your form with sample answers, then check your inbox for the notification. In Forminit, open the submission’s Workflow section to check the result.
Your published workflow now handles new submissions automatically.
Add and arrange steps
Section titled “Add and arrange steps”Select + beneath a step to add the next action. To insert an action between existing steps, select + on their connection line.
Before                           After selecting + on the line
╭─────────────────────────╮      ╭─────────────────────────╮
│   Submission received   │      │   Submission received   │
╰────────────┬────────────╯      ╰────────────┬────────────╯
╭────────────▼────────────╮      ┏━━━━━━━━━━━━▼━━━━━━━━━━━━┓
│ Send email notification │      ┃  Send to Google Sheets  ┃ new
╰─────────────────────────╯      ┗━━━━━━━━━━━━┯━━━━━━━━━━━━┛
                                 ╭────────────▼────────────╮
                                 │ Send email notification │
                                 ╰─────────────────────────╯
Select a step to edit its settings. There is no separate Save button for each step. Your edits take effect for live submissions only when you select Publish.
Follow the connection lines to see the order of the workflow. You can drag steps to organise the canvas or select Rearrange to tidy the layout.
Keep these rules in mind:
-
Every workflow starts with one Submission received step. You cannot delete it.
-
Every step must connect back to the start. Loops are not supported.
-
If / else is the only step that splits a workflow into different paths.
-
Separate paths cannot merge into a shared step.
✗ Not supported ✓ Supported ╭─────────────╮ ╭─────────────╮ │ If / else │ │ If / else │ ╰──────┬──────╯ ╰──────┬──────╯ ╭───────┴───────╮ ╭───────┴───────╮ │ If │ Else │ If │ Else ╭─────▼─────╮ ╭─────▼─────╮ ╭──────▼──────╮ ╭──────▼──────╮ │ Slack │ │ Email │ │ Slack │ │ Email │ ╰─────┬─────╯ ╰─────┬─────╯ ╰──────┬──────╯ ╰──────┬──────╯ ╰───────┬───────╯ │ │ │ ╭──────▼──────╮ ╭──────▼──────╮ ╭───────▼───────╮ │ Change │ │ Change │ │ Change status │ │ status │ │ status │ ╰───────────────╯ ╰─────────────╯ ╰─────────────╯ -
The same action cannot directly follow itself. For example, you cannot place two Slack steps in a row.
-
A branch with no connected steps ends that path.
To run an action for every submission, place it before a branching step. To run an action only for matching submissions, place it on the relevant branch.
             ╭────────────────────────────╮
             │    Submission received     │
             ╰──────────────┬─────────────╯
             ╭──────────────▼─────────────╮
             │  Send autoresponder email  │  ← every submission
             ╰──────────────┬─────────────╯
             ╭──────────────▼─────────────╮
             │         If / else          │
             │ Enquiry type equals Sales? │
             ╰──────────────┬─────────────╯
              ╭─────────────┴─────────────╮
              │ If                        │ Else
   ╭──────────▼──────────╮     ╭──────────▼──────────╮
   │      Send Slack     │     │      Send email     │
   │     notification    │     │     notification    │
   ╰─────────────────────╯     ╰─────────────────────╯
         ↑ sales only              ↑ everything else
Route submissions with conditions
Section titled “Route submissions with conditions”Use If / else to choose which actions run based on a submission’s answers.
An If / else step checks its branches in order: If, then any Else if branches, then Else. The submission follows the first matching branch. If no conditions match, it follows Else.
          New submission
                 │
╭────────────────▼───────────────╮  yes   ╭──────────────────╮
│ If: Enquiry type equals Sales? ├───────▶│    If branch     │
╰────────────────┬───────────────╯        ╰──────────────────╯
                 │ no
╭────────────────▼───────────────╮  yes   ╭──────────────────╮
│  Else if: Enquiry type equals  ├───────▶│  Else if branch  │
│            Support?            │        ╰──────────────────╯
╰────────────────┬───────────────╯
                 │ no
╭────────────────▼───────────────╮        ╭──────────────────╮
│     Else (nothing matched)     ├───────▶│   Else branch    │
╰────────────────────────────────╯        ╰──────────────────╯
Checking stops at the first match, so only one branch runs for each submission.
For example, a contact form can check whether the enquiry type is Sales, then Support, and send anything else to a general inbox.
Add a condition
Section titled “Add a condition”-
Add an If / else step where you want the workflow to branch.
-
Select the step and configure its If branch.
-
Choose a Field, a Condition, and a Value. For example:
Enquiry type→equals→Sales. -
Add more conditions if needed, and choose Match all or Match any.
-
Add Else if branches for other cases.
-
Add actions to each branch, including Else if unmatched submissions need a follow-up action.
With Match all, every condition in the branch must be true. With Match any, at least one must be true.
| Option | Example conditions | The branch matches when |
|---|---|---|
| Match all | Enquiry type equals Sales, Budget greater than 5000 |
Both conditions are true |
| Match any | Enquiry type equals Sales, Budget greater than 5000 |
At least one condition is true |
Put more specific branches first. For example, check for a sales enquiry with a budget greater than 5,000 before a broader branch that matches every sales enquiry.
✓ Specific first                    ✗ Broad first
╭────────────────────────────╮      ╭────────────────────────────╮
│       If: Sales AND        │      │         If: Sales          │
│       Budget > 5000        │      ╰──────────────┬─────────────╯
╰──────────────┬─────────────╯                     │ no
               │ no                 ┏━━━━━━━━━━━━━━▼━━━━━━━━━━━━━┓
╭──────────────▼─────────────╮      ┃     Else if: Sales AND     ┃
│       Else if: Sales       │      ┃       Budget > 5000        ┃
╰────────────────────────────╯      ┗━━━━━━━━━━━━━━━━━━━━━━━━━━━━┛
                                    ↑ never reached: every Sales
                                      enquiry already matched If
Choose fields and comparisons
Section titled “Choose fields and comparisons”Conditions can use form fields, sender details, and tracking data, and the answers of an earlier AI Classify step. The field picker is searchable, and the available comparisons depend on the field type.
| Data to check | Example comparisons |
|---|---|
| Text and choice fields | Equals, does not equal, contains, is one of |
| Empty or missing answers | Is empty, is not empty |
| Numbers | Greater than, between |
| Dates | Before, after |
| Email addresses and URLs | Domain equals, domain is one of |
| Phone numbers | Country code equals |
| File uploads | File count, extension, size |
| AI Classify answers | Equals, is one of, greater than or equal, between, exists, does not exist |
Choice fields show their available options. Country values use a searchable country list, while numbers and dates use the corresponding input controls.
Each condition must be complete before you can publish. If a field used in a condition is later removed from the form, update the condition to use another field.
Example workflows
Section titled “Example workflows”Send contact enquiries to the right team
Section titled “Send contact enquiries to the right team”Available on all plans.
Use one contact form for sales, support, and general enquiries. Add an Enquiry type select or radio field with Sales, Support, and General options.
-
Add If / else after Submission received.
-
Configure the branches using the table.
-
On each branch, add Send email notification and set its recipient.
-
Select Publish, then submit one sample enquiry for each route.
Replace the example addresses with your team’s inboxes.
| Branch | Condition | Notification recipient |
|---|---|---|
| If | Enquiry type equals Sales |
sales@example.com |
| Else if | Enquiry type equals Support |
support@example.com |
| Else | No earlier branch matched | hello@example.com |
                     ╭─────────────────────╮
                     │ Submission received │
                     ╰──────────┬──────────╯
                     ╭──────────▼──────────╮
                     │      If / else      │
                     │     Enquiry type    │
                     ╰──────────┬──────────╯
                                │
          ╭─────────────────────┼─────────────────────╮
          │ If: Sales           │ Else if: Support    │ Else
╭─────────▼─────────╮ ╭─────────▼─────────╮ ╭─────────▼─────────╮
│       Email       │ │       Email       │ │       Email       │
│       sales@      │ │      support@     │ │       hello@      │
╰───────────────────╯ ╰───────────────────╯ ╰───────────────────╯
A support enquiry reaches the support inbox. The sales and general notification steps are on other branches, so they do not run for that submission.
On a plan that includes autoresponders, you can also add Send autoresponder email before If / else to send the submitter a confirmation regardless of which team receives their enquiry.
Record leads and flag larger projects
Section titled “Record leads and flag larger projects”Requires Pro or higher.
Use a quote form with an email field and a numeric Budget field. State the currency on your form so the threshold has a consistent meaning.
This example records each lead in Google Sheets, then alerts your team in Slack when the submitted budget is greater than 5,000.
-
Add Send to Google Sheets after Submission received.
-
Connect your Google account, choose a spreadsheet and sheet tab, and map the lead’s name, email, and budget to columns.
-
Add If / else after the Google Sheets step.
-
Set the If condition to
Budget→greater than→5000. -
On the If branch, add Send Slack notification and configure your sales channel’s webhook URL.
-
On the Else branch, add Send email notification for your general enquiries inbox.
-
Select Publish and submit sample leads on either side of the threshold.
The workflow is arranged like this:
                ╭───────────────────────╮
                │  Submission received  │
                ╰───────────┬───────────╯
                ╭───────────▼───────────╮
                │ Send to Google Sheets │
                ╰───────────┬───────────╯
                ╭───────────▼───────────╮
                │       If / else       │
                │     Budget > 5000?    │
                ╰───────────┬───────────╯
              ╭─────────────┴─────────────╮
              │ If                        │ Else
  ╭───────────▼───────────╮   ╭───────────▼───────────╮
  │      Notify sales     │   │     Email general     │
  │        in Slack       │   │       enquiries       │
  ╰───────────────────────╯   ╰───────────────────────╯
For successful runs, a budget of 8,000 produces a spreadsheet row and a Slack notification. A budget of 3,000 produces a spreadsheet row and an email notification. A budget of exactly 5,000 follows Else, because the condition is greater than.
Placing Google Sheets before the condition makes it a shared step. It does not need to be repeated on both branches.
Available actions
Section titled “Available actions”| Action | What it does | Minimum plan |
|---|---|---|
| Send email notification | Emails you or your team about a submission | Free |
| Send autoresponder email | Replies to the person who submitted the form | Pro |
| Send webhook | Sends submission data to your URL in a POST request | Pro |
| Send Slack notification | Posts the submission to a Slack channel | Pro |
| Send Discord notification | Posts the submission to a Discord channel | Pro |
| Send to Google Sheets | Adds the submission as a spreadsheet row | Pro |
| AI Classify | Asks AI your questions about the submission and saves the answers for later steps | Free |
| Change status | Sets the status to Open, In progress, Done, or Closed | Free |
| Mark as spam | Moves the submission to Spam | Free |
| Send to trash | Moves the submission to Trash | Free |
| If / else | Routes the submission using conditions | Free |
Actions that require a paid plan show a Pro or Business badge. For forms in a workspace, the workspace owner’s plan applies. See pricing for plan details.
Send emails
Section titled “Send emails”Use Send email notification for messages to your team. Configure recipients, From name, Reply-to, CC, BCC, subject, and message.
Use Send autoresponder email for a reply to the submitter. Choose their address from an email field in your form.
Both actions offer three message modes:
-
Default: Forminit’s standard email containing the submission’s answers, with a preview based on the latest submission.
-
Custom: A rich text editor for your own message.
-
HTML: Your own HTML email.
Select Insert form field to insert an answer into your message. The picker supplies the variable for your form, so you do not need to guess its name.
Built-in variables include:
| Variable | Inserts |
|---|---|
{{@all-answers}} |
Every answer in the submission |
{{@date}} |
The submission date |
{{@form_name}} |
The form’s name |
See email notifications and autoresponders for more detail.
Send a webhook
Section titled “Send a webhook”Add Send webhook and enter the URL that should receive submission data.
Every webhook has a signing secret. Your receiving server can use it to verify that requests came from Forminit. You can show, copy, or regenerate the secret in the step’s settings.
A new webhook must pass Test before you can publish. Changing its URL or signing secret requires another test. The result appears beneath the URL and includes the endpoint’s HTTP status.
If you regenerate a secret, update your receiving endpoint before publishing.
See webhooks for the payload format and signature verification examples.
Connect Slack or Discord
Section titled “Connect Slack or Discord”Add Send Slack notification or Send Discord notification, then paste the webhook URL for the destination channel into the step’s settings.
See Slack notifications and Discord notifications for how to create a channel webhook URL.
Add rows to Google Sheets
Section titled “Add rows to Google Sheets”Add Send to Google Sheets, connect a Google account, choose or create a spreadsheet and sheet tab, then map form fields to columns.
Select Send test row to check your mapping. This immediately adds a row to the selected spreadsheet, before you publish the workflow.
Publishing updates the sheet’s header row to match your configured column labels.
See Google Sheets for more about column mapping.
Classify with AI
Section titled “Classify with AI”Add AI Classify to ask AI questions about each submission: is it spam, which team should handle it, how ready is the sender to buy. Choose which fields AI reads, write the questions or start from a ready-made set, and each answer becomes a variable such as {{ai.classify.team}} for every step placed after it. Use the answers in If / else conditions, emails, webhooks, Slack and Discord messages and Google Sheets columns.
See AI Classify for answer types, confidence settings and example workflows.
Organise submissions
Section titled “Organise submissions”Use Change status to set a submission to Open, In progress, Done, or Closed.
Mark as spam and Send to trash move the submission to the corresponding folder and need no settings. To apply either action only to certain submissions, place it after an If / else condition.
Publish changes
Section titled “Publish changes”Select Publish to apply all workflow steps and settings together. Until then, live submissions continue to use the published workflow.
                  ╭─────────────────────────╮
                  │   Edit steps on canvas  │
                  ╰────────────┬────────────╯
                  ╭────────────▼────────────╮
                  │   Unpublished changes   │
                  ╰────────────┬────────────╯
                               │
                ╭──────────────┴──────────────╮
                │ Publish                     │ Revert changes
   ╭────────────▼────────────╮   ╭────────────▼────────────╮
   │   New submissions use   │   │    Published workflow   │
   │       your changes      │   │     stays as it was     │
   ╰─────────────────────────╯   ╰─────────────────────────╯
Forminit highlights incomplete steps, missing settings, unfinished conditions, and webhooks that still need testing. Selecting Publish points you to anything that needs fixing.
A notice on the canvas shows when you have unpublished changes. Select Revert changes to discard them and restore the published workflow. If you leave the editor with unpublished changes, Forminit asks you to confirm before discarding them.
Check results and retry failures
Section titled “Check results and retry failures”Open Settings > Logs on your form to see action results. Filter by status, such as Success, Warning, or Error, and by action type.
For an individual submission, open its Workflow section. If actions failed, it shows the action name, error details, and the latest retry result. The submission’s inbox row also shows an error badge. When all actions succeeded, the section reports that they completed.
Retry a failed action
Section titled “Retry a failed action”-
Open the submission and expand Workflow.
-
Read the failed action’s error and fix the cause. If the action offers Open workflow, use it to correct the settings and publish the change.
-
Select Retry where available.
-
Review the confirmation, add an optional note, and confirm.
Retry runs only that action again, using the same submission. It does not restart the whole workflow. For an email failure, only the failed recipient is retried.
╭─────────────────────────╮
│  Send to Google Sheets  │  ✓ succeeded, not run again
╰────────────┬────────────╯
┏━━━━━━━━━━━━▼━━━━━━━━━━━━┓
┃ Send email notification ┃  ✗ failed
┗━━━━━━━━━━━━┯━━━━━━━━━━━━┛  ↻ Retry runs only this action
             │
╭────────────▼────────────╮
│ Send Slack notification │  ✓ succeeded, not run again
╰─────────────────────────╯The action shows Retrying while it runs and updates when it finishes. A successful retry clears the failed entry. If it fails again, the new error appears. If you retry too often, the button shows when you can try again.
Form owners and workspace members with workflow edit access can retry actions. Other members with submission access can view the results.
Run a workflow for a restored submission
Section titled “Run a workflow for a restored submission”Submissions caught as spam do not run a workflow. Restoring one to Inbox does not trigger it automatically.
╭────────────────────────╮
│     Caught as spam     │    Workflow: Not run
╰────────────┬───────────╯
             │ Move to Inbox
╭────────────▼───────────╮
│   Restored to Inbox    │    Workflow: still Not run
╰────────────┬───────────╯
             │ Run workflow
╭────────────▼───────────╮
│   Published workflow   │    Emails and integrations sent
│          runs          │
╰────────────────────────╯
To process a restored submission:
-
Open the submission’s Workflow section.
-
Check that it shows Not run.
-
Select Run workflow.
This runs the published workflow for that submission, including its emails and integrations. Its conditions may move the submission back to Spam or Trash.
Troubleshooting
Section titled “Troubleshooting”| Problem | What to check |
|---|---|
| Workflow button is missing | Open the form on desktop. The button is shown in desktop layouts. |
| Changes are not affecting new submissions | Check for unpublished changes and select Publish. |
| Publishing highlights an error | Complete the highlighted step, settings, or condition. Test any new or changed webhook. |
| A submission follows an unexpected branch | Check branch order and Match all or Match any. Only the first matching branch runs. |
| A path ends without running an action | Check whether the matching branch has any connected steps. |
| A notification or integration failed | Read the error in the submission’s Workflow section or the form’s Logs. |
| A restored submission has no workflow activity | Use Run workflow from its Not run section. |
Was this page helpful?
Thanks for your feedback.